* L2TP/IPSec VPN connections from VPN clients
VPN clients can establish L2TP/IPSec connections to the ISA Server firewall/VPN server. A machine certificate is required to create the IPSec encrypted tunnel.
* L2TP/IPSec VPN connections from VPN gateways (VPN routers)
Remote VPN gateways can call the ISA Server firewall/VPN server and establish a gateway to gateway link. These VPN gateways act as VPN routers and allow packets to be routed between networks through a the VPN tunnel established between the VPN gateways.
* L2TP/IPSec VPN connections to VPN servers
The ISA Server firewall/VPN server may need to establish a VPN client connection to a VPN server. For example, some Internet Service Providers require that machines establish a VPN connection with their VPN server in order to obtain a public address to connect to the Internet. In this case the ISA Server firewall/VPN server is a VPN client to the ISP’s VPN server.
* L2TP/IPSec VPN connections to VPN gateways
The ISA Server firewall/VPN server may need to call a VPN gateway to establish a VPN gateway to gateway link. Packets from networks behind each VPN gateway and be routed to a remote network behind the opposite gateway. The ISA Server firewall/VPN server is a VPN router using the Internet as its transit internetwork.
* Certificate-based user authentication using a certificate stored on the user machine
Users can obtain certificates and use those certificates to authenticate with the VPN server. The user certificate is stored on the user’s computer and a VPN connectoid can be configured to present this certificate during the PPP user authentication process.
* Certificate-based user authentication using a certificate stored on a Smart Card
Users can obtain certificates and use the certificate to authenticate with the VPN server. The user certificate is stored on a Smart Card and the VPN connectoid can be configured to present this certificate during the PPP user authentication process.
A Microsoft Certificate Server can take on one of four roles:
* Enterprise Root CA
* Enterprise Subordinate CA
* Stand-alone Root CA
* Stand-alone Subordinate CA
A Microsoft Stand-alone CA has the following characteristics:
* The stand-alone CA does not require Active Directory. This makes the stand-alone CA the Certificate Authority of choice in environments where there is no Active Directory infrastructure
* The stand-alone CA knows nothing about the user or computer account requesting the certificate. You must manually and explicitly include all details required to obtain the type of certificate you require.
* The stand-alone CA isn’t aware of the accounts in the Active Directory. If a user certificate is required, the user account must be in the local SAM of the stand-alone CA machine.
* The stand-alone CA does not immediately issue a certificate after the certificate request is made. By default, an administrator must approve the certificate request and then the client must retrieve the certificate after an administrator approves the request. The reason is the stand-alone CA does not check the validity of the user account.
* You cannot add or remove certificate templates to the stand-alone CA.
* The stand-alone CA can not issue user certificates that are stored on Smart Cards that allow the user to log on to a Windows Server 2003 domain
* The stand-alone CA’s self-signed certificate is not automatically added to the requester’s Trust Root Certification Authorities certificate store. You must add the CA certificate to the Root Store manually.
* The stand-alone CA can receive limited support from the Active Directory when it is installed by a domain administrator in an Active Directory domain. When the stand-alone CA is installed by a domain administrator, the CA certificate of the stand-alone CA will be added to the Trusted Root Certification Authorities certificate store for all domain users and computers.
We recommend that you install a stand-alone CA only when:
* You do not have an Active Directory domain, and/or
* You do not require automatic deployment of certificates to users and computers
If you have users who require certificates and those users are not members of your Active Directory domain, then use a stand-alone Certificate Server. These users can obtain certificates from the stand-alone CA’s Web enrollment site. The Web enrollment site runs on Internet Information Server 6.0. You need to install IIS on the stand-alone CA computer before installing Certificate Services.
This ISA Server 2000 VPN Deployment Kit document describes the following procedures:
* Installing the Microsoft Internet Information Services World Wide Web service
* Install a Windows Server 2003 standalone Certification Authority
Installing Microsoft Internet Information Services World Wide Web Service
Perform the following steps to install IIS 6.0 on the Windows Server 2003 computer. The machine can be a standalone server, a member server in an Active Directory domain, or even a domain controller:
1. Click Start, point to Control Panel and click Add or Remove Programs.
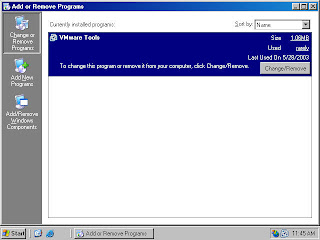
2. Click the Add/Remove Windows Components button in the Add or Remove Programs window (figure 1).
Figure 1 (fig111)
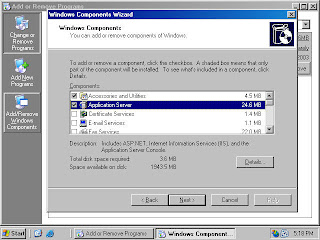
3. On the Windows Components window, click on the Application Server entry and click the Details button (figure 2).
Figure 2 (fig112)
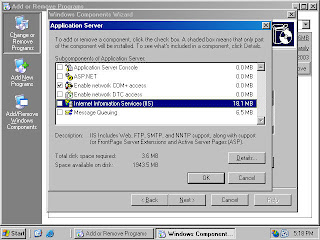
4. On the Application Server page, click on the Internet Information Services (IIS) entry and click the Details button (figure 3).
Figure 3 (fig113)
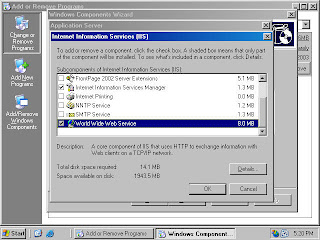
5. In the Internet Information Service (IIS) dialog box, put a checkmark in the World Wide Web Service checkbox and click OK (figure 4).
Figure 4 (fig114)
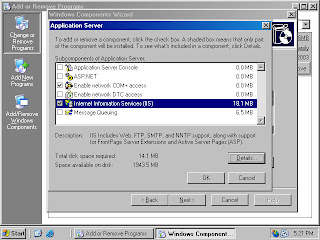
6. Click OK on the Application Server dialog box (figure 5).
Figure 5 (fig115)
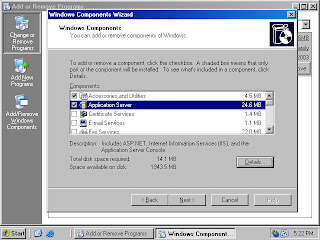
7. Click Next on the Windows Components dialog box (figure 6).
Figure 6 (fig116)
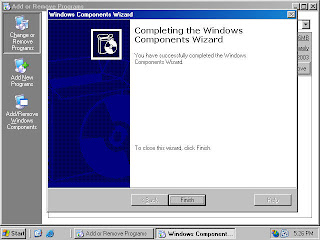
8. Click Finish on the Completing the Windows Components Wizard page (figure 7).
Figure 7 (fig117)
Installing Microsoft Certificate Services
Perform the following steps to install and configure a stand-alone CA on a Windows Server 2003 computer:
* Note: We recommend that you install the stand-alone CA on a member server or domain controller on your internal network. This will allow the stand-alone CA’s certificate to be placed automatically into the Trusted Root Certification Authorities certificate store for all users and computers.
1. At a member server or domain controller in your internal network, log on as a domain administrator. Click Start, point to Control Panel and click Add/Remove Programs.
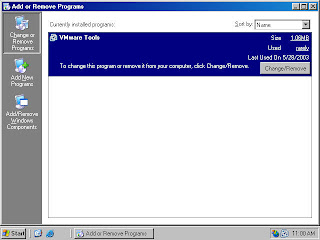
2. In the Add or Remove Programs window (figure 8), click the Add/Remove Windows Components button.
Figure 8 (fig100)
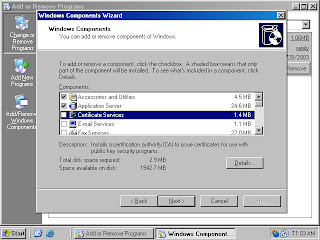
3. In the Windows Components dialog box (figure 9), click on the Certificate Services entry and click the Details button.
Figure 9 (fig101)
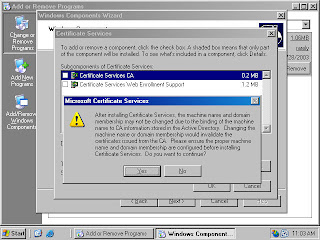
4. In the Certificate Services dialog box, put a checkmark in the Certificate Services CA checkbox (figure 3). A Microsoft Certificate Services dialog box appears and informs you that you can not change the machine name or the domain membership of the machine while it acts as a certificate server. Read the information in the dialog box and click Yes.
Figure 10 (fig102)
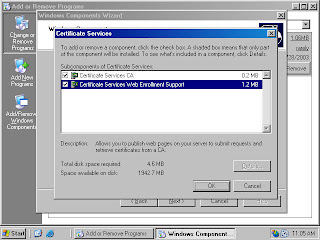
5. Both the Certificate Services CA and Certificate Services Web Enrollment Support checkboxes are checked (figure 11). Click OK in the Certificate Services dialog box.
Figure 11 (fig103)
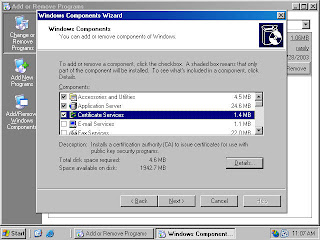
6. Click Next in the Windows Components dialog box (figure 12).
Figure 12 (fig104)
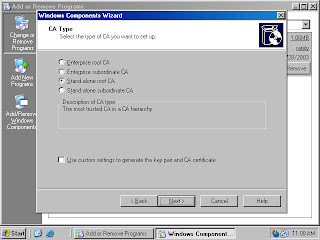
7. Select the Stand-alone root CA option on the CA Type page (figure 13). Click Next.
Figure 13 (fig105)
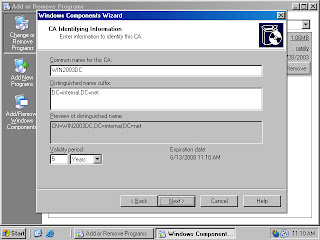
8. On the CA Identifying Information page (figure 14), type in a Common name for this CA. The common name of the CA is typically the DNS host name or NetBIOS name (computer name) of the machine running Certificate Services. In this example, the name of the machine is WIN2003DC, so we will enter WIN2003DC in the Common name for this CA text box. The default Validity Period of the CA’s self-signed certificate is 5 years. Accept this default value unless you have a reason to change it. Click Next.
Figure 14 (fig106)
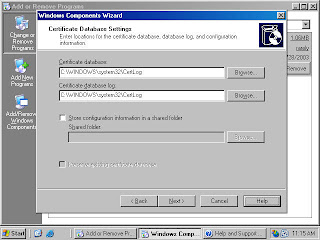
9. On the Certificate Database Settings page (figure 15), use the default locations for the Certificate Database and Certificate Database Log. You do not need to specify a shared folder to store configuration information because this information will be stored in the Active Directory. Click Next.
Figure 15 (fig107)
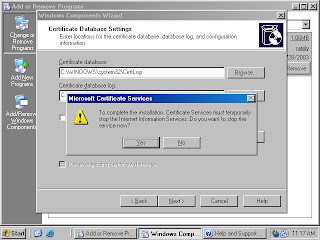
10. Click Yes on the Microsoft Certificate Services dialog box (figure 16) informing you that Internet Information Services must be stopped temporarily.
Figure 16 (fig108)
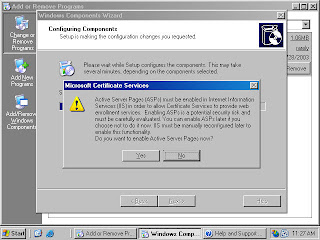
11. Click Yes on the Microsoft Certificate Services dialog box (figure 17) informing you that Active Server Pages must be enabled on IIS if you wish to use the Certificate Services Web enrollment site.
Figure 17 (fig109)
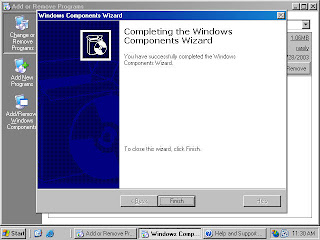
12. Click Finish on the Completing the Windows Components Wizard page (figure 18).
Figure 18 (fig110)
13. Close the Add or Remove Programs window.
The standalone Certificate Server is now ready to accept certificate requests.
Approving Certificate Requests to a Standalone Certificate Authority
The stand-alone CA does not automatically issue a certificate when a certificate request is made. The reason is the standalone CA is not able to confirm the validity of the request. It does not check the information provided by the requestor against a directory, such as the enterprise CA does when validating credentials against the Active Directory.
You should keep this default behavior for your published standalone CA in order to prevent users on the Internet from obtaining certificates without your review. Perform the following steps to approve a certificate request:
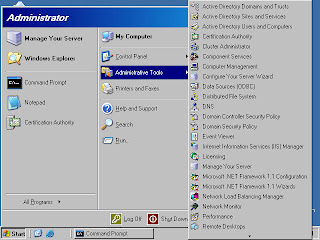
1. Click Start and point to Administrative Tools. Click on the Certification Authority link (figure 19).
Figure 19 (fig701)
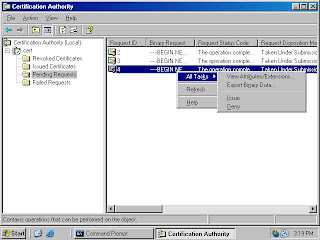
2. In the Certification Authority console (figure 20), expand the server name and then click on the Pending Certificates node. You see a list of pending certificate requests in the right pane of the console. You can see who requested the certificate by scrolling to the right and looking under the Requester Name column (not shown). Right click on the certificate request in the right pane of the console, point to All Tasks and click Issue. The certificate request is removed from the Pending Requests node.
Figure 20 (fig702)
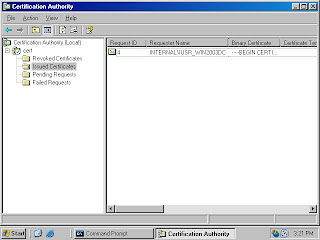
3. Click on the Issued Certificates node in the left pane of the Certification Authority console. The certificate request you approved appears in the right pane of the console. This indicates the certificate request was approved. It does not indicate the machine issuing the request has returned to the Web enrollment site to retrieve the certificate (figure 21).
Figure 21 (fig703)
Certificate server cannot rename computer name anymore.
ReplyDeleteCertificate Services on Win 2008 R2
ReplyDeletehttp://d3planet.com/rtfb/2009/11/10/install-certificate-services-on-windows-server-2008-r2/
Thanks for your sharing.
ReplyDelete