remove IM from inspection map
policy-map type inspect im MSNIM
description Blocking MSNIM
parameters
match protocol msn-im
drop-connection log
policy-map global_policy
class inspection_default
inspect h323 h225
inspect h323 ras
inspect rsh
inspect rtsp
inspect sqlnet
inspect skinny
inspect sunrpc
inspect xdmcp
inspect sip
inspect netbios
inspect tftp
inspect dns preset_dns_map
inspect ftp
inspect icmp
!
service-policy global_policy global
Showing posts with label Cisco ASA firewalls. Show all posts
Showing posts with label Cisco ASA firewalls. Show all posts
Friday, August 17, 2012


Thursday, June 14, 2012
"PMTU-D packet.... MTU packet error"
Case scenario : ssh login drops / stuck during authentication using with VPN client.
FIX: sysopt connection tcpmss 1300
crypto ipsec df-bit clear-df outside
Tuesday, May 15, 2012
How to enable ssh in ASA from inside accesss
AAA authentication ssh console LOCAL
ssh 192.168.0.0 255.255.255.0 inside_interface_name
ssh 192.168.0.0 255.255.255.0 inside_interface_name
How to check outbound traffic high in ASA?
1- Capture the dropped packets on the ASA side using the following commands:
cap capdrop type asp-drop all // after issuing this command, wait for some time after that issue the following command
show cap capdrop // please collect the output of this command and send it to me
2- Please do a spanning for the port connecting the ASA on the switch to another port and connect a PC and collect wireshark captures, if you have Cisco switch, you can use the following commands to span the port:
(config)#monitor session 1 source interfaceboth
(config)#monitor session 1 dest interface
Please perform step one when you plug in all the cable. For step 2, you may skip if you are not able to capture with Wireshark.
cap capdrop type asp-drop all // after issuing this command, wait for some time after that issue the following command
show cap capdrop // please collect the output of this command and send it to me
2- Please do a spanning for the port connecting the ASA on the switch to another port and connect a PC and collect wireshark captures, if you have Cisco switch, you can use the following commands to span the port:
(config)#monitor session 1 source interface
(config)#monitor session 1 dest interface
Please perform step one when you plug in all the cable. For step 2, you may skip if you are not able to capture with Wireshark.
Monday, February 20, 2012
Recovery enable password in ASA5510
To recover from the loss of passwords, perform the following steps:
Step 1 Connect to the security appliance console port according to the "Accessing the Command-Line Interface".
Buy and Sell Cisco Network Gear.
Step 2 Power off the security appliance, and then power it on.
Step 3 During the startup messages, press the Escape key when prompted to enter ROMMON.
Step 4 To set the security appliance to ignore the startup configuration at reload, enter the following command:
rommon #1> confreg
The security appliance displays the current configuration register value, and asks if you want to change the value:
Current Configuration Register: 0x00000011
Configuration Summary:
boot TFTP image, boot default image from Flash on netboot failure
Do you wish to change this configuration? y/n [n]:
Step 5 Record your current configuration register value, so you can restore it later.
Step 6 At the prompt, enter Y to change the value.
The security appliance prompts you for new values.
Step 7 Accept the default values for all settings, except for the "disable system configuration?" value; at that prompt, enter Y.
Step 8 Reload the security appliance by entering the following command:
rommon #2> boot
The security appliance loads a default configuration instead of the startup configuration.
Step 9 Enter privileged EXEC mode by entering the following command:
hostname> enable
Step 10 When prompted for the password, press Return.
The password is blank.
Step 11 Load the startup configuration by entering the following command:
hostname# copy startup-config running-config
Step 12 Enter global configuration mode by entering the following command:
hostname# configure terminal
Step 13 Change the passwords in the configuration by entering the following commands, as necessary:
hostname(config)# password password
hostname(config)# enable password password
hostname(config)# username name password password
Step 14 Change the configuration register to load the startup configuration at the next reload by entering the following command:
hostname(config)# config-register value
Where value is the configuration register value you noted in Step 5. 0×1 is the default configuration register. For more information about the configuration register, see the Cisco Security Appliance Command Reference.
Step 15 Save the new passwords to the startup configuration by entering the following command:
hostname(config)# copy running-config startup-config
Step 1 Connect to the security appliance console port according to the "Accessing the Command-Line Interface".
Buy and Sell Cisco Network Gear.
Step 2 Power off the security appliance, and then power it on.
Step 3 During the startup messages, press the Escape key when prompted to enter ROMMON.
Step 4 To set the security appliance to ignore the startup configuration at reload, enter the following command:
rommon #1> confreg
The security appliance displays the current configuration register value, and asks if you want to change the value:
Current Configuration Register: 0x00000011
Configuration Summary:
boot TFTP image, boot default image from Flash on netboot failure
Do you wish to change this configuration? y/n [n]:
Step 5 Record your current configuration register value, so you can restore it later.
Step 6 At the prompt, enter Y to change the value.
The security appliance prompts you for new values.
Step 7 Accept the default values for all settings, except for the "disable system configuration?" value; at that prompt, enter Y.
Step 8 Reload the security appliance by entering the following command:
rommon #2> boot
The security appliance loads a default configuration instead of the startup configuration.
Step 9 Enter privileged EXEC mode by entering the following command:
hostname> enable
Step 10 When prompted for the password, press Return.
The password is blank.
Step 11 Load the startup configuration by entering the following command:
hostname# copy startup-config running-config
Step 12 Enter global configuration mode by entering the following command:
hostname# configure terminal
Step 13 Change the passwords in the configuration by entering the following commands, as necessary:
hostname(config)# password password
hostname(config)# enable password password
hostname(config)# username name password password
Step 14 Change the configuration register to load the startup configuration at the next reload by entering the following command:
hostname(config)# config-register value
Where value is the configuration register value you noted in Step 5. 0×1 is the default configuration register. For more information about the configuration register, see the Cisco Security Appliance Command Reference.
Step 15 Save the new passwords to the startup configuration by entering the following command:
hostname(config)# copy running-config startup-config
Monday, January 16, 2012
The VPN Client cannot communicate with DMZ Zone

access-list DMZ_access_in extended permit ip 192.168.3.0 255.255.255.0 192.168.5.0 255.255.255.0

access-list DMZ_nat0_outbound extended permit ip 192.168.5.0 255.255.255.0 192.168.3.0 255.255.255.0
Friday, December 9, 2011
Remote Access VPN Creation
1) Wizards Menus -> IP Sec VPN Wizard
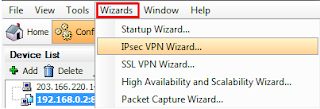
2) Choose Remote Access and check box on for Split Tunnel and choose interface where client connect to and Click Next.
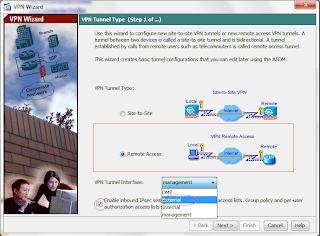
3) Next
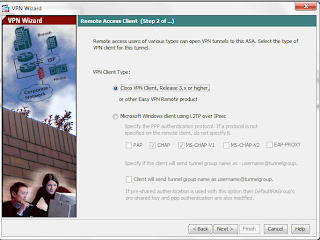
4) Key in PSK key and Tunnel Group Name and Next.
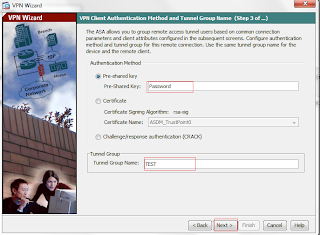
5) Click Next
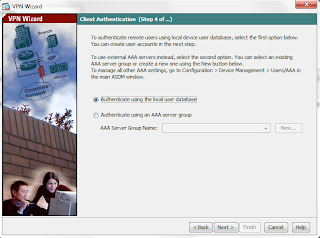
6) Create user account to access TEST tunnel. < user1, pwd- 123 >
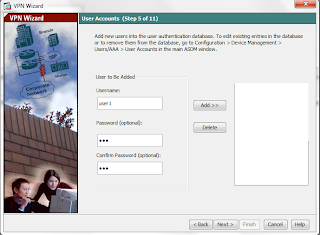
7) Choose Pool name or Can add new pool name for distributing IPs to VPN clients after tunnel established.
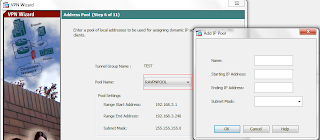
8) Assign DNS server IPs
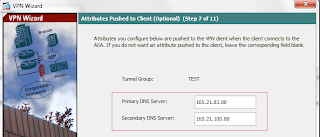
9) Next
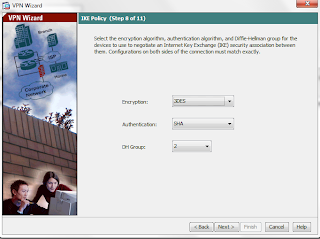
10) Next
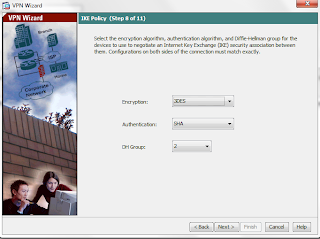
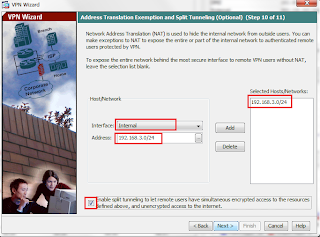
11) Check split tunnel if allow VPN user to access internet from their own internet line. Choose inside interface and add inside network range for Nat translation
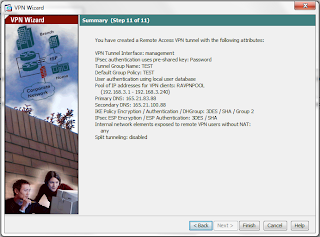
12) Finish
Adding Rules for VPN
1)
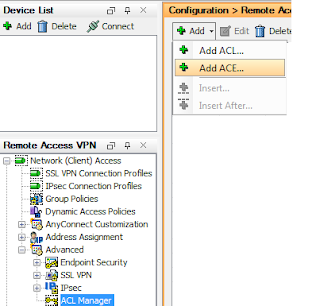
2) Put VPN network range in Source. Eg.RAVPNPOOL RANGE ( 192.168.3.0/24 )
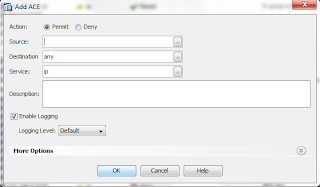

2) Choose Remote Access and check box on for Split Tunnel and choose interface where client connect to and Click Next.

3) Next

4) Key in PSK key and Tunnel Group Name and Next.

5) Click Next

6) Create user account to access TEST tunnel. < user1, pwd- 123 >
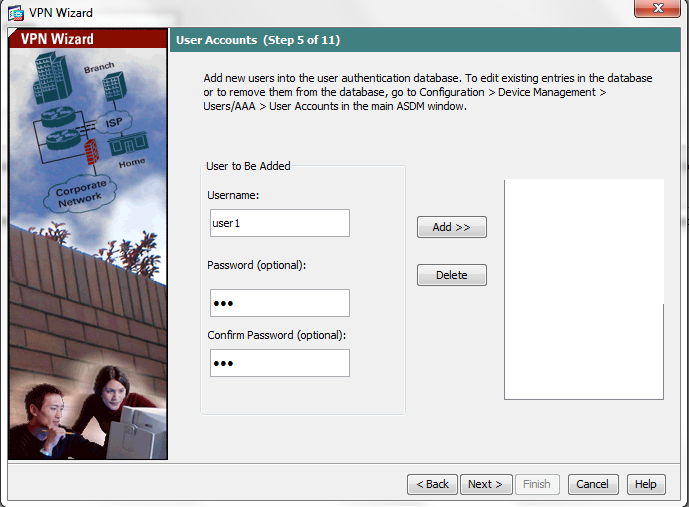
7) Choose Pool name or Can add new pool name for distributing IPs to VPN clients after tunnel established.

8) Assign DNS server IPs

9) Next

10) Next

11) Check split tunnel if allow VPN user to access internet from their own internet line. Choose inside interface and add inside network range for Nat translation

12) Finish

Adding Rules for VPN
1)

2) Put VPN network range in Source. Eg.RAVPNPOOL RANGE ( 192.168.3.0/24 )

Wednesday, November 23, 2011
VPN Client Drops Connection Frequently on First Attempt or "Security VPN Connection terminated by tier. Reason 433." or "Secure VPN Connection termina
Problem
Cisco VPN client users might receive this error when they attempt the connection with the head end VPN device.
"VPN client drops connection frequently on first attempt" or "Security VPN Connection terminated by tier. Reason 433." or "Secure VPN Connection terminated by Peer Reason 433:(Reason Not Specified by Peer)" or "Attempted to assign network or broadcast IP address, removing (x.x.x.x) from pool"
Solution 1
The problem might be with the IP pool assignment either through ASA/PIX, Radius server, DHCP server or through Radius server acting as DHCP server. Use the debug crypto command in order to verify that the netmask and IP addresses are correct. Also, verify that the pool does not include the network address and the broadcast address. Radius servers must be able to assign the proper IP addresses to the clients.
Solution 2
This issue also occurs due to the failure of extended authentication. You must check the AAA server to troubleshoot this error. Checking the server authentication password on Server and client and reloading the AAA server might resolve this issue.
Solution 3
Another workaround for this issue is to disable the threat detection feature. At times when there are multiple re-transmissions for different incomplete Security Associations (SAs), the ASA with the threat-detection feature enabled thinks that a scanning attack is occuring and the VPN ports are marked as the main offender. Try to disable the threat-detection feature as this can cause a lot of overhead on the processing of ASA. Use these commands in order to disable the threat detection:
no threat-detection basic-threat
no threat-detection scanning-threat shun
no threat-detection statistics
no threat-detection rate
For me, I've fixed with Solution3
Cisco VPN client users might receive this error when they attempt the connection with the head end VPN device.
"VPN client drops connection frequently on first attempt" or "Security VPN Connection terminated by tier. Reason 433." or "Secure VPN Connection terminated by Peer Reason 433:(Reason Not Specified by Peer)" or "Attempted to assign network or broadcast IP address, removing (x.x.x.x) from pool"
Solution 1
The problem might be with the IP pool assignment either through ASA/PIX, Radius server, DHCP server or through Radius server acting as DHCP server. Use the debug crypto command in order to verify that the netmask and IP addresses are correct. Also, verify that the pool does not include the network address and the broadcast address. Radius servers must be able to assign the proper IP addresses to the clients.
Solution 2
This issue also occurs due to the failure of extended authentication. You must check the AAA server to troubleshoot this error. Checking the server authentication password on Server and client and reloading the AAA server might resolve this issue.
Solution 3
Another workaround for this issue is to disable the threat detection feature. At times when there are multiple re-transmissions for different incomplete Security Associations (SAs), the ASA with the threat-detection feature enabled thinks that a scanning attack is occuring and the VPN ports are marked as the main offender. Try to disable the threat-detection feature as this can cause a lot of overhead on the processing of ASA. Use these commands in order to disable the threat detection:
no threat-detection basic-threat
no threat-detection scanning-threat shun
no threat-detection statistics
no threat-detection rate
For me, I've fixed with Solution3
Tuesday, December 15, 2009
Teamviewer block on firewall ASA5510
I've used regular expressions for blocking access to certain domains in the past.
This should get you going in the right direction.
regex teamviewer "\.teamviewer\.com"
regex crossloop "\.crossloop\.com"
class-map type regex match-any blockeddomains
(config-cmap)# match regex teamviewer
(config-cmap)# match regex crossloop
For more information
http://www.cisco.com/en/US/products/ps6120/products_configuration_example09186a0080940c5a.shtml
Check out the section on blocking youtube.
For DLINK DFL 1600
http://security.dlink.com.tw/netdefend_ids_view2.asp?sno=32468
This should get you going in the right direction.
regex teamviewer "\.teamviewer\.com"
regex crossloop "\.crossloop\.com"
class-map type regex match-any blockeddomains
(config-cmap)# match regex teamviewer
(config-cmap)# match regex crossloop
For more information
http://www.cisco.com/en/US/products/ps6120/products_configuration_example09186a0080940c5a.shtml
Check out the section on blocking youtube.
For DLINK DFL 1600
http://security.dlink.com.tw/netdefend_ids_view2.asp?sno=32468
Subscribe to:
Posts (Atom)